Dreamweaver
- open up Dreamweaver, will be using two of the languages in the second column, HTML, CSS and JavaScript
- search engines use language such as PHP and XML, they're extremely complicated and only there for advanced web designers
> create a new HTML document
- this creates a basic, blank web page
- to have a website with nothing on, you actually have ten lines of code
line 1: <!DOCTYPE html PUBLIC "-//W3C//DTD XHTML 1.0 Transitional//EN" "http://www.w3.org/TR/xhtml1/DTD/xhtml1-transitional.dtd">
- this code isn't necessary for a website to work, can be simplified down
- delete line 1
- change new line 1 to just <html>
line 3: <meta http-equiv="Content-Type" content="text/html; charset=UTF-8" />
- meta tag, most common usage are key words on search engines, can create searchable words called 'key words' that are embedded within meta tags
- this isn't needed, delete line 3
- this is now the most basic site you could ever create
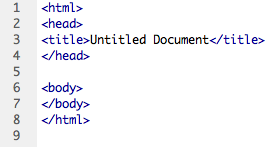
line 1: <html>, beginning, scripting language, from this point onwards we are speaking in HTML
line 2: <head>, things that aren't actually visible in the design of the website, include this in open and close head tag, isn't actually design, just makes it function in a certain way
line 3: <title>Untitled Document</title> this will not be seen as it is within the head tags, not actual title just there for functionality of the website
line 4: </head>, end of head tag where things aren't visible within design, functionality of website
line 5: blank
line 6: <body>, what is going to be visible within the design of the site
line 7: </body>, end of what is visible within website
line 8: </html>, end, we have finished talking in html
- can't save website yet because it isn't set up as a working website
- for a website to work, it must be a folder with a URL
- every website in the world is a folder on a computer somewhere else which contains every single thing that's on that website > entering the URL allows you to access this folder
- if the page isn't inside the folder, or a certain element is missing, it will not work
- this folder is called a ROUTE folder
Creating a route folder
- you must use the User Work folder, otherwise this will not work
- do not use capitals for the name of the folder, or have it any longer than eight characters
- create another new folder inside of this folder > sub folder > name 'images'
- need to tell Dreamweaver where the route folder is
- site > new site > site name > local site folder > hard drive > user work > beth
- your route folder and images folder will now display in the files panel
- you are now ready to save this page
- file > save as > (DO NOT save file as 'home.html' as home is an English word, internet is global) > save as index.html
- if you do not have an index page, when the URL is typed in, nothing will actually show up
- to preview on the internet > globe icon > preview in Safari - save and preview as you go along so that you can see any mistakes you are making
- web page comes with title of 'Untitled Document', this can be changed by editing line 3, in between <title> and </title>
- to include any form of design, it must be included in between the <body> brackets
- this can then be seen in the browser
Formatting text and creating layouts
- skip working in HTML, straight to CSS
- from the homepage (index.html), we are going to have three more pages
- if you create web pages solely in html, you will have to type everything out over and over because you cannot copy and paste in html, this is why we won't be working in it
- CSS, advanced web layout techniques, only have to type everything once then link style sheets to html pages
file > new > blank page > CSS > create
line 1: what type of keyboard
line 2: note to the user, doesn't affect anyone, can write notes to yourself as a reminder of what code is doing what
- creating a CSS tag for the body, type in body on line 4, to open settings for body press space then {
- press enter > type 'f' > click font family > choose desired font family > arial, helvetica, sans-serif
- to end this setting, type a semi colon at the end of the text ;
- to close this, press enter, then close curly bracket }
- file > save as > style sheet
- need to link style sheet to home page > right hand side of screen > CSS styles > attach style sheet (links image)
- browse > route folder > style sheet > open
- puts code in head area
- changes can be seen on browser
- change font size and colour in same way font family was chosen
- font size > 12px
- colour > #000 or #000000
- create what you want
Creating more on layout
- creating the three columns
- tip to get rid of white space
- laying out columns


No comments:
Post a Comment